

How To Create Provider In Ionic 4
A comprehensive step by step tutorial of Ionic 3 and Angular 4 Mobile App Example with pages lazy loading. This updated tutorial using the latest Ionic-Angular 3.7.1 and Angular 4.3 HttpClient features for building Ionic 3 and Angular 4 mobile app from scratch.
Jumps to the steps:
- Create a new Ionic 3 and Angular 4 App
- Create Ionic 3 Service
- Modify Existing Home Page
- Run the Ionic and Angular App in Browser and Devices
The following tools, module, and dependencies are required to achieve the goals of this Ionic 3 and Angular 4 tutorial:
- Node.js (Stable or recommended version)
- Latest Ionic 3, Angular 4 and Cordova
- Terminal or (Node.js) Command Line
- Text Editor or IDE
- Android or iOS device (If necessary)
We assume that you have installed Node.js and able to run `npm` in Node.js command line (Windows) or Terminal (OS X/Linux). To make sure everything is up to date, type this command in the terminal or Node command line.
npm install -g [email protected] Or if using OS X terminal.
sudo npm install -g [email protected] Check Ionic version and it's the environment.
ionic info And here's a production-ready and stable configuration.
cli packages: (/usr/local/lib/node_modules) @ionic/cli-utils : 1.12.0 ionic (Ionic CLI) : 3.12.0 System: Node : v6.9.4 npm : 3.10.10 OS : macOS Sierra Misc: backend : legacy
Create a new Ionic 3 and Angular 4 App
Go to your projects folder then type this command to create a new Ionic 3 and Angular 4 initial app.
ionic start new-ionic3-angular4 tabs That command will create Ionic 3 and Angular 4 app with the name `new-ionic3-angular4` and use tabs template. Now, open the newly created project folder in your IDE or Text Editor then open `package.json` to see the default installed package for building the Ionic 3 and Angular 4 app. It looks like this.
"dependencies": { "@angular/common": "4.4.3", "@angular/compiler": "4.4.3", "@angular/compiler-cli": "4.4.3", "@angular/core": "4.4.3", "@angular/forms": "4.4.3", "@angular/http": "4.4.3", "@angular/platform-browser": "4.4.3", "@angular/platform-browser-dynamic": "4.4.3", "@ionic-native/core": "4.3.0", "@ionic-native/splash-screen": "4.3.0", "@ionic-native/status-bar": "4.3.0", "@ionic/storage": "2.0.1", "ionic-angular": "3.7.1", "ionicons": "3.0.0", "rxjs": "5.4.3", "sw-toolbox": "3.6.0", "zone.js": "0.8.18" }, "devDependencies": { "@ionic/app-scripts": "3.0.0", "typescript": "2.3.4" }, Next, go to the newly created folder from terminal or command line.
cd ./new-ionic3-angular4 For the first time, run your Ionic 3 and Angular 4 app by typing this command.
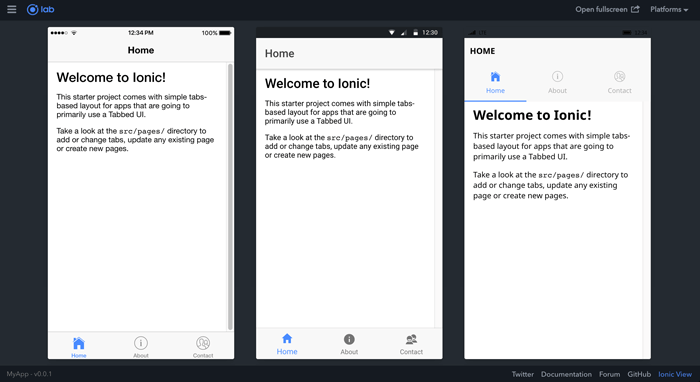
ionic serve -l That command will automatically open the default browser and go to the default Ionic 3 app page, you can expand platforms and choose your desired platform.
Create Ionic 3 Service
To access or consume RESTful Web Service, we create Ionic 3 service to hold the related functions. Here we will implement the new Angular 4.3 HttpClient than bundle with Angular Common library. Type this command for creating Ionic service or provider, but first, close the running app by press `ctrl+c` key.
ionic g provider rest Now, open and edit `src/providers/rest/rest.ts` then replace default `http` imports and add other imports.
import { HttpClient } from '@angular/common/http'; import { Observable } from 'rxjs/Observable'; import 'rxjs/add/operator/catch'; Also, replace 'Http' injection in the constructor.
constructor(public http: HttpClient) { console.log('Hello RestProvider Provider'); } Declare URL string variable below the class name.
private apiUrl = 'https://restcountries.eu/rest/v2/all'; We will use free REST API web service for getting countries. Now, create this function below the constructor.
getCountries(): Observable<string[]> { return this.http.get(this.apiUrl) .map(this.extractData) .catch(this.handleError); } private extractData(res: Response) { let body = res; return body || { }; } private handleError (error: Response | any) { let errMsg: string; if (error instanceof Response) { const err = error || ''; errMsg = `${error.status} - ${error.statusText || ''} ${err}`; } else { errMsg = error.message ? error.message : error.toString(); } console.error(errMsg); return Observable.throw(errMsg); }
Modify Existing Home Page
Now, it's a time to display country list on the Home page. First, we have to modify "src/pages/home/home.ts" replace all codes with this.
import { Component } from '@angular/core'; import { NavController } from 'ionic-angular'; import { RestProvider } from '../../providers/rest/rest'; @Component({ selector: 'page-home', templateUrl: 'home.html' }) export class HomePage { countries: string[]; errorMessage: string; constructor(public navCtrl: NavController, public rest: RestProvider) { } ionViewDidLoad() { this.getCountries(); } getCountries() { this.rest.getCountries() .subscribe( countries => this.countries = countries, error => this.errorMessage = <any>error); } } Next, open and edit "src/pages/home/home.html" then replace all tags inside `<ionic-content>` tag with this.
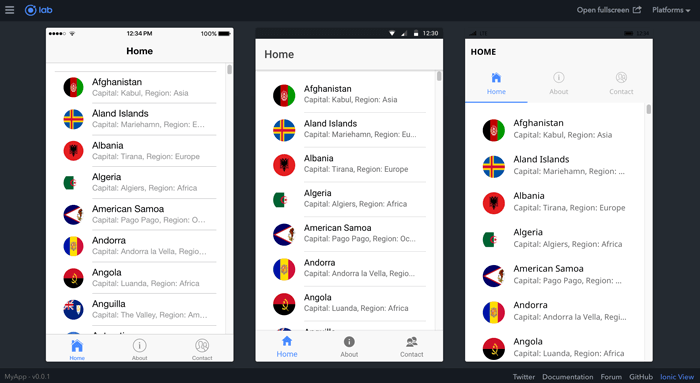
<ion-content padding> <ion-list> <ion-item *ngFor="let c of countries"> <ion-avatar item-left> <img src="{{c.flag}}"> </ion-avatar> <h2>{{c.name}}</h2> <p>Capital: {{c.capital}}, Region: {{c.region}}</p> </ion-item> </ion-list> </ion-content> That it's, our simple Ionic 3 and Angular 4 app is ready to run.
Run the Ionic and Angular App in Browser and Devices
To test in the browser, run again this command.
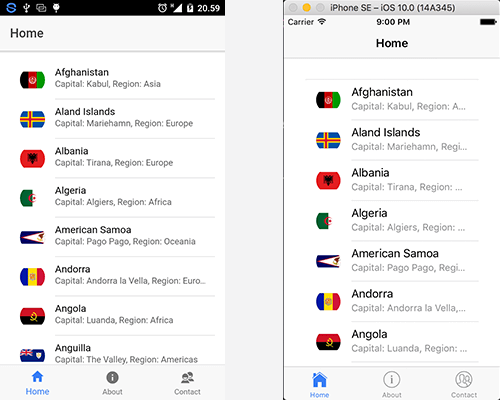
ionic serve -l You will see Ionic 3 and Angular 4 app on the browser show country list.
To test on Android or iOS device, first, update Cordova to the latest version.
sudo npm install -g cordova Now, remove the default generated platform.
ionic cordova rm android ionic cordova add android ionic cordova rm ios ionic cordova add ios To run on the Android.
ionic cordova run android --prod To run on the iOS device.
ionic cordova run ios --prod We know that building beautifully designed Ionic apps from scratch can be frustrating and very time-consuming. Check Ionic 4 - Full Starter App and save development and design time. Android, iOS, and PWA, 100+ Screens and Components, the most complete and advance Ionic Template.
That just the basic. If you need more deep learning about Ionic, Angular, and Typescript, you can take the following cheap course:
[Original Article, April 2017]
This tutorial shows you how to build Ionic 3 and Angular 4 mobile app in the step by step example with pages lazy loading. The Ionic 3 is still beta and it launches a few days ago. For that, we do not yet recommend to use this beta version in production or published app. Before we started, there is some checklist should be done.
- Node.js already installed with Node.js command prompt on Windows.
- Update Ionic to the latest version using this command.
npm install -g [email protected] or
sudo npm install -g [email protected] - Check Ionic version and it's the environment.
ionic info If you create Ionic 3 app from an earlier version you will ask a question below just click Enter.
Looks like this is an Ionic Angular project, would you like to install @ionic/cli-plug in-ionic-angular and continue? Yes The result will be like this.
global packages: @ionic/cli-utils : 1.4.0 Ionic CLI : 3.4.0 local packages: @ionic/app-scripts : 1.3.1 @ionic/cli-plugin-ionic-angular : 1.3.1 Ionic Framework : ionic-angular 3.0.1 System: Node : v6.9.4 OS : OS X El Capitan Xcode : Xcode 8.0 Build version 8A218a ios-deploy : 1.9.0 ios-sim : 5.0.12 npm : 3.10.10 As usual, we start the tutorial from scratch. We will build the Ionic 3 app that shows the list of countries taken from the REST API. We will be using this API from REST Countries.
1. Create Ionic 3 App
Still the same as the previous version of Ionic. Type this command to create a new Ionic 3 App.
ionic start ionic3-angular4 tabs In the previous version the command still uses "--v2" prefix, but with the latest version just like an above command. It will automatically run "npm install" and will take some minutes to finish.
"dependencies": { "@angular/common": "4.1.3", "@angular/compiler": "4.1.3", "@angular/compiler-cli": "4.1.3", "@angular/core": "4.1.3", "@angular/forms": "4.1.3", "@angular/http": "4.1.3", "@angular/platform-browser": "4.1.3", "@angular/platform-browser-dynamic": "4.1.3", "@ionic-native/core": "3.12.1", "@ionic-native/splash-screen": "3.12.1", "@ionic-native/status-bar": "3.12.1", "@ionic/storage": "2.0.1", "ionic-angular": "3.5.0", "ionicons": "3.0.0", "rxjs": "5.4.0", "sw-toolbox": "3.6.0", "zone.js": "0.8.12" }, Now, run it on the browser after type this command.
ionic serve --lab 
You will see the new looks than the first version of Ionic 3.
2. Workaround for Pages Lazy Loading
Before we move forward, let's implement this Ionic 3 lazy loading guides. Begin with modifying 'src/app/app.module.ts' remove all import, declarations and entry components of all pages. The file content should be like this now.
import { NgModule, ErrorHandler } from '@angular/core'; import { BrowserModule } from '@angular/platform-browser'; import { IonicApp, IonicModule, IonicErrorHandler } from 'ionic-angular'; import { MyApp } from './app.component'; import { StatusBar } from '@ionic-native/status-bar'; import { SplashScreen } from '@ionic-native/splash-screen'; @NgModule({ declarations: [ MyApp ], imports: [ BrowserModule, IonicModule.forRoot(MyApp, { preloadModules: true }) ], bootstrap: [IonicApp], entryComponents: [ MyApp ], providers: [ StatusBar, SplashScreen, {provide: ErrorHandler, useClass: IonicErrorHandler} ] }) export class AppModule {} Now, change add module file for each page. For example, the file name should be like this 'pages/home/home.modules.ts'. Then add these lines of codes.
import { NgModule } from '@angular/core'; import { HomePage} from './home'; import { IonicPageModule } from 'ionic-angular'; @NgModule({ declarations: [HomePage], imports: [IonicPageModule.forChild(HomePage)], entryComponents: [HomePage] }) export class HomePageModule { } Next, we have to add import and annotation to current 'pages/home/home.ts'.
import { IonicPage } from 'ionic-angular'; ... @IonicPage() @Component({ selector: 'page-home', templateUrl: 'home.html' }) export class HomePage { ... Do the same thing for another page give name following the class name of the page.
The last thing is to modify 'src/app/app.component.ts' by removing import to the page. Then change the reference to the page to be a string by adding a single quote.
Before:
rootPage:any = TabsPage; After:
rootPage:any = 'TabsPage'; You should do the same way for calling the page from another page. For example, in the tabs page.
import { Component } from '@angular/core'; import { IonicPage } from 'ionic-angular'; @IonicPage() @Component({ templateUrl: 'tabs.html' }) export class TabsPage { tab1Root: string = 'HomePage'; tab2Root: string = 'AboutPage'; tab3Root: string = 'ContactPage'; constructor() { } }
3. Create Ionic 3 Service
For accessing REST API, we need to create Service or Provider by type this command.
ionic generate provider rest Open and edit "src/providers/rest.ts" then add or change these imports.
import { Http, Response } from '@angular/http'; import { Observable } from 'rxjs/Observable'; import 'rxjs/add/operator/catch'; import 'rxjs/add/operator/map'; Declare URL string variable below the class name.
private apiUrl = 'https://restcountries.eu/rest/v2/all'; Create these functions.
getCountries(): Observable<string[]> { return this.http.get(this.apiUrl) .map(this.extractData) .catch(this.handleError); } private extractData(res: Response) { let body = res.json(); return body || { }; } private handleError (error: Response | any) { let errMsg: string; if (error instanceof Response) { const body = error.json() || ''; const err = body.error || JSON.stringify(body); errMsg = `${error.status} - ${error.statusText || ''} ${err}`; } else { errMsg = error.message ? error.message : error.toString(); } console.error(errMsg); return Observable.throw(errMsg); } We have to register "HttpModule" in "app.module.ts", add this import to "app.module.ts".
import { HttpModule } from '@angular/http'; In @NgModule imports, section adds "HttpModule" so it will look like this.
imports: [ BrowserModule, IonicModule.forRoot(MyApp), HttpModule ], Still on "app.module.ts", register "Rest" Provider by import that provider first.
import { Rest } from '../providers/rest'; In @NgModule providers, section adds "Rest".
providers: [ StatusBar, SplashScreen, {provide: ErrorHandler, useClass: IonicErrorHandler}, Rest ]
4. Modify Existing Home Page
Now, it's a time to display country list on the Home page. First, we have to modify "src/pages/home/home.ts" replace all codes with this.
import { Component } from '@angular/core'; import { IonicPage } from 'ionic-angular'; import { NavController } from 'ionic-angular'; import { Rest } from '../../providers/rest'; @IonicPage() @Component({ selector: 'page-home', templateUrl: 'home.html' }) export class HomePage { countries: string[]; errorMessage: string; constructor(public navCtrl: NavController, public rest: Rest) { } ionViewDidLoad() { this.getCountries(); } getCountries() { this.rest.getCountries() .subscribe( countries => this.countries = countries, error => this.errorMessage = <any>error); } } Next, open and edit "src/pages/home/home.html" then replace all tags with this.
<ion-header> <ion-navbar> <ion-title>Home</ion-title> </ion-navbar> </ion-header> <ion-content padding> <ion-list> <ion-item *ngFor="let c of countries"> <ion-avatar item-left> <img src="{{c.flag}}"> </ion-avatar> <h2>{{c.name}}</h2> <p>Capital: {{c.capital}}, Region: {{c.region}}</p> </ion-item> </ion-list> </ion-content> That it's, our simple Ionic 3 and Angular 4 app is ready to run.
5. Run the App in Browser and Devices
Before running on real devices, first, run this app in the browser by type this command.
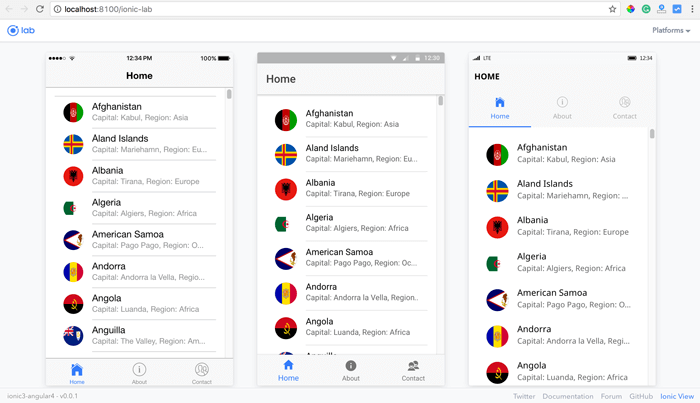
ionic serve --lab You will see the list of the countries like below.
Now, on the real device, we have to modify default config.xml to make API calls without error. Add this preference.
<preference name="loadUrlTimeoutValue" value="700000" /> Next, we have to clean up default platform that generated when create Ionic 3 app.
ionic cordova platform rm ios ionic cordova platform add ios ionic cordova platform rm android ionic cordova platform add android Connect your device to your computer. Run this command for Android device.
ionic cordova run android And for iOS run this command.
ionic cordova run ios You see this on Android and iOS devices.
6. Conclusion
We have done and run all steps in this tutorial smoothly. It seems no difference between Ionic 3 - Angular 4 and Ionic 2 - Angular 2. Maybe in the more complex mobile app, we will get significant improvement especially in the performance of Angular 4.
An event we do not recommend yet to build production mobile app, we still can try to build a simple mobile app for production. Until now, Ionic Framework team still working very hard to make this Ionic 3 beta to be released version.
Feel free to give us comments, critics or suggestion below to improve this article
You can find the full source code on our Github.
Thanks
How To Create Provider In Ionic 4
Source: https://www.djamware.com/post/58e657b680aca764ec903c2d/ionic-3-and-angular-4-mobile-app-example
Posted by: johnsonbefteeprishe.blogspot.com
0 Response to "How To Create Provider In Ionic 4"
Post a Comment